mirror of
https://github.com/nextcloud/all-in-one.git
synced 2026-05-22 03:10:16 +00:00
1035 lines
37 KiB
Markdown
1035 lines
37 KiB
Markdown
# Using a reverse proxy or secure tunnel with Nextcloud AIO
|
|
|
|
## Overview
|
|
|
|
Nextcloud AIO needs to be accessed over HTTPS. You have three options:
|
|
|
|
| Approach | Best for | Inbound Ports |
|
|
|----------|----------|---------------|
|
|
| **Integrated** (AIO's built-in HTTPS) | Simple setups with port 443 available | Yes (443) |
|
|
| **External Reverse Proxy** (Caddy, Nginx, Cloudflare Proxy, etc.) | Multiple services on one IP, or existing reverse proxy | Yes (443) |
|
|
| **Secure Tunnel** (Cloudflare Tunnel or Tailscale) | No port forwarding possible/desired | No |
|
|
|
|
> [!NOTE]
|
|
> For a purely local setup, see the [local instance documentation](https://github.com/nextcloud/all-in-one/blob/main/local-instance.md) instead.
|
|
|
|
### Integrated HTTPS (no reverse proxy needed)
|
|
|
|
AIO includes a built-in reverse proxy with automatic HTTPS. Use this if:
|
|
- You have a publicly reachable IP address (not behind carrier-grade NAT)
|
|
- Port `443/tcp` is available for AIO's exclusive use
|
|
|
|
**→ If this fits your needs, follow the [standard AIO instructions](https://github.com/nextcloud/all-in-one#how-to-use-this) and skip this document.**
|
|
|
|
### External reverse proxy
|
|
|
|
Use this when port 443 is already in use or you run multiple services on one IP. Your reverse proxy handles TLS termination and forwards plain HTTP to AIO's Apache container. **AIO's built-in HTTPS is disabled in this mode.**
|
|
|
|
Supported options: Apache, Caddy, Nginx, Traefik, HAProxy, NPM, and others.
|
|
|
|
> [!NOTE]
|
|
> **Cloudflare Tunnel** vs **Cloudflare Proxy** are different:
|
|
> - **Cloudflare Tunnel** — no inbound ports required; outbound-only connection.
|
|
> - **Cloudflare Proxy** (orange cloud DNS) — still requires port 443 exposed on your server.
|
|
|
|
> [!NOTE]
|
|
> AIO requires a dedicated hostname (e.g. `cloud.example.com`). Subfolder paths like `example.com/nextcloud/` are not supported.
|
|
|
|
### Secure tunnels (no port forwarding)
|
|
|
|
| Service | Access scope |
|
|
|---------|-------------|
|
|
| **Cloudflare Tunnel** | Public Internet |
|
|
| **Tailscale Serve** | Your tailnet only (private) |
|
|
| **Tailscale Funnel** | Public Internet via Tailscale |
|
|
|
|
> [!TIP]
|
|
> Due to [Cloudflare Tunnel/Proxy limitations](https://github.com/nextcloud/all-in-one/tree/main#notes-on-cloudflare-proxytunnel), Tailscale is generally recommended when possible.
|
|
> - Private/personal use: [Tailscale Serve](https://tailscale.com/kb/1312/serve)
|
|
> - Public access without port forwarding: [Tailscale Funnel](https://tailscale.com/kb/1223/funnel)
|
|
|
|
---
|
|
|
|
## Setup steps
|
|
|
|
> [!TIP]
|
|
> Don't have a domain yet? We recommend [Tailscale](https://github.com/nextcloud/all-in-one/discussions/6817). Don't have a reverse proxy yet? We recommend [Caddy](https://github.com/nextcloud/all-in-one/discussions/575).
|
|
|
|
1. **Configure** your reverse proxy using one of the sample configs below.
|
|
2. **Start** the AIO mastercontainer with `APACHE_PORT` set. See [startup command](#2-startup-command).
|
|
3. **Validate** your domain in the AIO interface at `https://<host-ip>:8080`.
|
|
|
|
Optional steps:
|
|
- Restrict Apache to localhost: [Step 3](#3-limit-access-to-the-apache-container)
|
|
- Add trusted proxy IPs: [Step 5](#5-optional-trusted-proxy-configuration)
|
|
- Get a valid cert for the AIO interface: [Step 6](#6-optional-valid-certificate-for-the-aio-interface)
|
|
- Troubleshooting: [Step 7](#7-troubleshooting)
|
|
|
|
> [!IMPORTANT]
|
|
> If you need HTTPS between the reverse proxy and AIO (because they run on different servers), use either a local reverse proxy with self-signed certs on the AIO host, or a VPN tunnel between the two servers.
|
|
|
|
> [!NOTE]
|
|
> The Apache container is created by the mastercontainer. You **cannot** provide custom Docker labels or environment variables to it.
|
|
|
|
---
|
|
|
|
## 1. Configure the reverse proxy
|
|
|
|
### Adapting the sample configurations
|
|
|
|
In every sample config below:
|
|
- Replace `<your-nc-domain>` with your Nextcloud domain.
|
|
- Replace `11000` with your chosen `APACHE_PORT`.
|
|
- Replace `localhost` / `127.0.0.1` with the correct address based on your setup:
|
|
|
|
<details>
|
|
<summary>Reverse proxy on the same host (no container)</summary>
|
|
|
|
Use `localhost:$APACHE_PORT` as-is.
|
|
|
|
</details>
|
|
|
|
<details>
|
|
<summary>Reverse proxy in a Docker container on the same host</summary>
|
|
|
|
Choose one of these approaches:
|
|
1. **Host networking**: Add `--network host` (or `network_mode: host`) to the reverse proxy container. Use `localhost:$APACHE_PORT`.
|
|
2. **APACHE_ADDITIONAL_NETWORK**: Set this env variable to attach AIO's Apache container to the reverse proxy's Docker network. Use `http://nextcloud-aio-apache:$APACHE_PORT`. ⚠️ The network must exist before starting AIO.
|
|
3. **Join `nextcloud-aio` network**: Add it as a secondary external network on the reverse proxy container. Use `http://nextcloud-aio-apache:$APACHE_PORT`.
|
|
|
|
</details>
|
|
|
|
<details>
|
|
<summary>Reverse proxy on a different server</summary>
|
|
|
|
Use the private IP of the AIO host: `private.ip.address.of.aio.server:$APACHE_PORT`.
|
|
|
|
To find the private IP on Linux: `ip a | grep "scope global" | head -1 | awk '{print $2}' | sed 's|/.*||'`
|
|
|
|
</details>
|
|
|
|
---
|
|
|
|
### Apache
|
|
|
|
<details>
|
|
<summary>click here to expand</summary>
|
|
|
|
**Disclaimer:** This config may need adjustments. Improvements welcome!
|
|
|
|
Requires certbot certificates. Add as a new Apache site config:
|
|
|
|
```
|
|
<VirtualHost *:80>
|
|
ServerName <your-nc-domain>
|
|
|
|
RewriteEngine On
|
|
RewriteCond %{HTTPS} off
|
|
RewriteRule (.*) https://%{HTTP_HOST}%{REQUEST_URI}
|
|
RewriteCond %{SERVER_NAME} =<your-nc-domain>
|
|
RewriteRule ^ https://%{SERVER_NAME}%{REQUEST_URI} [END,NE,R=permanent]
|
|
</VirtualHost>
|
|
|
|
<VirtualHost *:443>
|
|
ServerName <your-nc-domain>
|
|
|
|
# Reverse proxy based on https://httpd.apache.org/docs/current/mod/mod_proxy_wstunnel.html
|
|
RewriteEngine On
|
|
ProxyPreserveHost On
|
|
RequestHeader set X-Real-IP %{REMOTE_ADDR}s
|
|
AllowEncodedSlashes NoDecode
|
|
|
|
ProxyPass / http://localhost:11000/ nocanon
|
|
ProxyPassReverse / http://localhost:11000/
|
|
|
|
RewriteCond %{HTTP:Upgrade} websocket [NC]
|
|
RewriteCond %{HTTP:Connection} upgrade [NC]
|
|
RewriteCond %{THE_REQUEST} "^[a-zA-Z]+ /(.*) HTTP/\d+(\.\d+)?$"
|
|
RewriteRule .? "ws://localhost:11000/%1" [P,L,UnsafeAllow3F]
|
|
|
|
# Enable h2, h2c and http1.1
|
|
Protocols h2 h2c http/1.1
|
|
|
|
# Solves slow upload speeds caused by http2
|
|
H2WindowSize 5242880
|
|
|
|
# TLS
|
|
SSLEngine on
|
|
SSLProtocol -all +TLSv1.2 +TLSv1.3
|
|
SSLCipherSuite ECDHE-ECDSA-AES128-GCM-SHA256:ECDHE-RSA-AES128-GCM-SHA256:ECDHE-ECDSA-AES256-GCM-SHA384:ECDHE-RSA-AES256-GCM-SHA384:ECDHE-ECDSA-CHACHA20-POLY1305:ECDHE-RSA-CHACHA20-POLY1305:DHE-RSA-AES128-GCM-SHA256:DHE-RSA-AES256-GCM-SHA384:DHE-RSA-CHACHA20-POLY1305
|
|
SSLHonorCipherOrder off
|
|
SSLSessionTickets off
|
|
|
|
# If running apache on a subdomain of a domain that already has a wildcard cert from certbot,
|
|
# replace <your-nc-domain> below with just the root domain (e.g. example.com).
|
|
SSLCertificateFile /etc/letsencrypt/live/<your-nc-domain>/fullchain.pem
|
|
SSLCertificateKeyFile /etc/letsencrypt/live/<your-nc-domain>/privkey.pem
|
|
|
|
# Disable HTTP TRACE method.
|
|
TraceEnable off
|
|
<Files ".ht*">
|
|
Require all denied
|
|
</Files>
|
|
|
|
# Support big file uploads
|
|
LimitRequestBody 0
|
|
Timeout 86400
|
|
ProxyTimeout 86400
|
|
</VirtualHost>
|
|
```
|
|
|
|
Enable required modules:
|
|
```
|
|
sudo a2enmod rewrite proxy proxy_http proxy_wstunnel ssl headers http2
|
|
```
|
|
|
|
</details>
|
|
|
|
### Caddy (recommended)
|
|
|
|
<details>
|
|
<summary>click here to expand</summary>
|
|
|
|
Add to your `Caddyfile`:
|
|
|
|
```
|
|
https://<your-nc-domain>:443 {
|
|
reverse_proxy localhost:11000
|
|
}
|
|
```
|
|
|
|
The `Caddyfile` (no extension) should be in the same directory as your `compose.yaml`.
|
|
|
|
For a more complete example, see [this guide](https://github.com/nextcloud/all-in-one/discussions/575#discussion-4055615).
|
|
|
|
</details>
|
|
|
|
### Caddy with ACME DNS-challenge
|
|
|
|
<details>
|
|
<summary>click here to expand</summary>
|
|
|
|
1. Get a Caddy build with your DNS provider's module — see [this guide](https://caddy.community/t/how-to-use-dns-provider-modules-in-caddy-2/8148).
|
|
2. Add to your `Caddyfile`:
|
|
```
|
|
https://<your-nc-domain>:443 {
|
|
reverse_proxy localhost:11000
|
|
tls {
|
|
dns <provider> <key>
|
|
}
|
|
}
|
|
```
|
|
3. Add `--env SKIP_DOMAIN_VALIDATION=true` to the mastercontainer `docker run` command (DNS challenge doesn't open a public port for domain validation).
|
|
|
|
> [!TIP]
|
|
> For local network access, add the reverse proxy's internal IP as an A record, disable DNS rebind protection in your router, or use a local DNS server (e.g. Pi-hole) with a custom record. Alternatively, add the domain to `/etc/hosts` on each device.
|
|
|
|
</details>
|
|
|
|
### OpenLiteSpeed
|
|
|
|
<details>
|
|
<summary>click here to expand</summary>
|
|
|
|
See [this guide by @MorrowShore](https://github.com/nextcloud/all-in-one/discussions/6370).
|
|
|
|
</details>
|
|
|
|
### Citrix ADC VPX / Citrix Netscaler
|
|
|
|
<details>
|
|
<summary>click here to expand</summary>
|
|
|
|
See [this guide by @esmith443](https://github.com/nextcloud/all-in-one/discussions/2452).
|
|
|
|
</details>
|
|
|
|
### Cloudflare Tunnel
|
|
|
|
<details>
|
|
<summary>click here to expand</summary>
|
|
|
|
> [!NOTE]
|
|
> Review [Cloudflare Tunnel/Proxy caveats](https://github.com/nextcloud/all-in-one#notes-on-cloudflare-proxytunnel) before proceeding.
|
|
|
|
1. Install Cloudflare Tunnel on the same machine as AIO and point it to `http://localhost:11000`.
|
|
2. Add `--env SKIP_DOMAIN_VALIDATION=true` to the mastercontainer `docker run` command.
|
|
3. [Disable Cloudflare's Rocket Loader](https://help.nextcloud.com/t/login-page-not-working-solved/149417/8) to prevent login issues.
|
|
|
|
For a more complete example, see [this guide](https://github.com/nextcloud/all-in-one/discussions/2845#discussioncomment-6423237).
|
|
|
|
</details>
|
|
|
|
### HAProxy
|
|
|
|
<details>
|
|
<summary>click here to expand</summary>
|
|
|
|
**Disclaimer:** This config may need adjustments. Improvements welcome!
|
|
|
|
```
|
|
global
|
|
chroot /var/haproxy
|
|
log /var/run/log audit debug
|
|
lua-prepend-path /tmp/haproxy/lua/?.lua
|
|
ssl-default-bind-ciphers ECDHE-ECDSA-AES128-GCM-SHA256:ECDHE-RSA-AES128-GCM-SHA256:ECDHE-ECDSA-AES256-GCM-SHA384:ECDHE-RSA-AES256-GCM-SHA384:ECDHE-ECDSA-CHACHA20-POLY1305:ECDHE-RSA-CHACHA20-POLY1305:DHE-RSA-AES128-GCM-SHA256:DHE-RSA-AES256-GCM-SHA384:DHE-RSA-CHACHA20-POLY1305
|
|
ssl-default-bind-ciphersuites TLS_AES_128_GCM_SHA256:TLS_AES_256_GCM_SHA384:TLS_CHACHA20_POLY1305_SHA256
|
|
ssl-default-bind-options ssl-min-ver TLSv1.2 no-tls-tickets
|
|
|
|
ssl-default-server-ciphers ECDHE-ECDSA-AES128-GCM-SHA256:ECDHE-RSA-AES128-GCM-SHA256:ECDHE-ECDSA-AES256-GCM-SHA384:ECDHE-RSA-AES256-GCM-SHA384:ECDHE-ECDSA-CHACHA20-POLY1305:ECDHE-RSA-CHACHA20-POLY1305:DHE-RSA-AES128-GCM-SHA256:DHE-RSA-AES256-GCM-SHA384:DHE-RSA-CHACHA20-POLY1305
|
|
ssl-default-server-ciphersuites TLS_AES_128_GCM_SHA256:TLS_AES_256_GCM_SHA384:TLS_CHACHA20_POLY1305_SHA256
|
|
ssl-default-server-options ssl-min-ver TLSv1.2 no-tls-tickets
|
|
|
|
defaults
|
|
log global
|
|
option redispatch -1
|
|
retries 3
|
|
default-server init-addr last,libc
|
|
|
|
# Frontend: LetsEncrypt_443 ()
|
|
frontend LetsEncrypt_443
|
|
bind 0.0.0.0:443 name 0.0.0.0:443 ssl crt-list /tmp/haproxy/ssl/605f6609f106d1.17683543.certlist
|
|
mode http
|
|
option http-keep-alive
|
|
default_backend acme_challenge_backend
|
|
option forwardfor
|
|
# tuning options
|
|
timeout client 30s
|
|
|
|
# logging options
|
|
# ACL: find_acme_challenge
|
|
acl acl_605f6d4b6453d2.03059920 path_beg -i /.well-known/acme-challenge/
|
|
# ACL: Nextcloud
|
|
acl acl_60604e669c3ca4.13013327 hdr(host) -i <your-nc-domain>
|
|
|
|
# ACTION: redirect_acme_challenges
|
|
use_backend acme_challenge_backend if acl_605f6d4b6453d2.03059920
|
|
# ACTION: Nextcloud
|
|
use_backend Nextcloud if acl_60604e669c3ca4.13013327
|
|
|
|
|
|
# Frontend: LetsEncrypt_80 ()
|
|
frontend LetsEncrypt_80
|
|
bind 0.0.0.0:80 name 0.0.0.0:80
|
|
mode tcp
|
|
default_backend acme_challenge_backend
|
|
# tuning options
|
|
timeout client 30s
|
|
|
|
# logging options
|
|
# ACL: find_acme_challenge
|
|
acl acl_605f6d4b6453d2.03059920 path_beg -i /.well-known/acme-challenge/
|
|
|
|
# ACTION: redirect_acme_challenges
|
|
use_backend acme_challenge_backend if acl_605f6d4b6453d2.03059920
|
|
|
|
# Frontend (DISABLED): 1_HTTP_frontend ()
|
|
|
|
# Frontend (DISABLED): 1_HTTPS_frontend ()
|
|
|
|
# Frontend (DISABLED): 0_SNI_frontend ()
|
|
|
|
# Backend: acme_challenge_backend (Added by Let's Encrypt plugin)
|
|
backend acme_challenge_backend
|
|
# health checking is DISABLED
|
|
mode http
|
|
balance source
|
|
# stickiness
|
|
stick-table type ip size 50k expire 30m
|
|
stick on src
|
|
# tuning options
|
|
timeout connect 30s
|
|
timeout server 30s
|
|
http-reuse safe
|
|
server acme_challenge_host 127.0.0.1:43580
|
|
|
|
# Backend: Nextcloud ()
|
|
backend Nextcloud
|
|
mode http
|
|
balance source
|
|
server Nextcloud localhost:11000
|
|
```
|
|
|
|
</details>
|
|
|
|
### Nginx, Freenginx, Openresty, Angie
|
|
|
|
<details>
|
|
<summary>click here to expand</summary>
|
|
|
|
For a more complete example, see [this guide](https://github.com/nextcloud/all-in-one/discussions/588#discussioncomment-2811152).
|
|
|
|
Check your Nginx version with `nginx -v` and adjust the version-specific lines accordingly.
|
|
|
|
```
|
|
map $http_upgrade $connection_upgrade {
|
|
default upgrade;
|
|
'' close;
|
|
}
|
|
|
|
server {
|
|
listen 80;
|
|
listen [::]:80; # comment to disable IPv6
|
|
|
|
if ($scheme = "http") {
|
|
return 301 https://$host$request_uri;
|
|
}
|
|
if ($http_x_forwarded_proto = "http") {
|
|
return 301 https://$host$request_uri;
|
|
}
|
|
|
|
listen 443 ssl http2; # for nginx versions below v1.25.1
|
|
listen [::]:443 ssl http2; # for nginx versions below v1.25.1 - comment to disable IPv6
|
|
|
|
# listen 443 ssl; # for nginx v1.25.1+
|
|
# listen [::]:443 ssl; # for nginx v1.25.1+ - keep comment to disable IPv6
|
|
# http2 on; # uncomment to enable HTTP/2 - supported on nginx v1.25.1+
|
|
|
|
# listen 443 quic reuseport; # uncomment to enable HTTP/3 / QUIC - supported on nginx v1.25.0+ - please remove "reuseport" if there is already another quic listener on port 443 with enabled reuseport
|
|
# listen [::]:443 quic reuseport; # uncomment to enable HTTP/3 / QUIC - supported on nginx v1.25.0+ - please remove "reuseport" if there is already another quic listener on port 443 with enabled reuseport - keep comment to disable IPv6
|
|
# http3 on; # uncomment to enable HTTP/3 / QUIC - supported on nginx v1.25.0+
|
|
# quic_gso on; # uncomment to enable HTTP/3 / QUIC - supported on nginx v1.25.0+
|
|
# quic_retry on; # uncomment to enable HTTP/3 / QUIC - supported on nginx v1.25.0+
|
|
# quic_bpf on; # improves HTTP/3 / QUIC - supported on nginx v1.25.0+, if nginx runs as a docker container you need to give it privileged permission to use this option
|
|
# add_header Alt-Svc 'h3=":443"; ma=86400'; # uncomment to enable HTTP/3 / QUIC - supported on nginx v1.25.0+
|
|
|
|
proxy_buffering off;
|
|
proxy_request_buffering off;
|
|
|
|
client_max_body_size 0;
|
|
client_body_buffer_size 512k;
|
|
# http3_stream_buffer_size 512k; # uncomment to enable HTTP/3 / QUIC - supported on nginx v1.25.0+
|
|
proxy_read_timeout 86400s;
|
|
|
|
server_name <your-nc-domain>;
|
|
|
|
location / {
|
|
proxy_pass http://127.0.0.1:11000$request_uri;
|
|
|
|
proxy_set_header X-Forwarded-For $proxy_add_x_forwarded_for;
|
|
proxy_set_header X-Forwarded-Port $server_port;
|
|
proxy_set_header X-Forwarded-Scheme $scheme;
|
|
proxy_set_header X-Forwarded-Proto $scheme;
|
|
proxy_set_header X-Real-IP $remote_addr;
|
|
proxy_set_header Host $host;
|
|
proxy_set_header Early-Data $ssl_early_data;
|
|
|
|
# Websocket
|
|
proxy_http_version 1.1;
|
|
proxy_set_header Upgrade $http_upgrade;
|
|
proxy_set_header Connection $connection_upgrade;
|
|
}
|
|
|
|
# If running nginx on a subdomain of a domain that already has a wildcard cert from certbot,
|
|
# replace <your-nc-domain> below with just the root domain (e.g. example.com).
|
|
ssl_certificate /etc/letsencrypt/live/<your-nc-domain>/fullchain.pem; # managed by certbot on host machine
|
|
ssl_certificate_key /etc/letsencrypt/live/<your-nc-domain>/privkey.pem; # managed by certbot on host machine
|
|
|
|
ssl_dhparam /etc/dhparam; # curl -L https://ssl-config.mozilla.org/ffdhe2048.txt -o /etc/dhparam
|
|
|
|
ssl_early_data on;
|
|
ssl_session_timeout 1d;
|
|
ssl_session_cache shared:SSL:10m;
|
|
|
|
ssl_protocols TLSv1.2 TLSv1.3;
|
|
ssl_ecdh_curve x25519:x448:secp521r1:secp384r1:secp256r1;
|
|
|
|
ssl_prefer_server_ciphers on;
|
|
ssl_conf_command Options PrioritizeChaCha;
|
|
ssl_ciphers TLS_AES_256_GCM_SHA384:TLS_CHACHA20_POLY1305_SHA256:TLS_AES_128_GCM_SHA256:ECDHE-ECDSA-AES256-GCM-SHA384:ECDHE-ECDSA-CHACHA20-POLY1305:ECDHE-ECDSA-AES128-GCM-SHA256:ECDHE-RSA-AES256-GCM-SHA384:ECDHE-RSA-CHACHA20-POLY1305:ECDHE-RSA-AES128-GCM-SHA256;
|
|
}
|
|
```
|
|
|
|
</details>
|
|
|
|
### NPMplus (Fork of Nginx-Proxy-Manager)
|
|
|
|
<details>
|
|
<summary>click here to expand</summary>
|
|
|
|
> [!NOTE]
|
|
> This is not needed when running NPMplus as a community container.
|
|
|
|
Make sure `PUID` and `PGID` in the NPM `compose.yaml` are unset or set to `0`. If you need to change them, add `net.ipv4.ip_unprivileged_port_start=0` to `/etc/sysctl.conf`.
|
|
|
|
See these screenshots for a working config:
|
|
|
|
<img width="675" height="695" alt="image" src="https://github.com/user-attachments/assets/196f53f9-ff86-4da2-960e-f7b7a2ceac0c" />
|
|
|
|
<img width="675" height="355" alt="image" src="https://github.com/user-attachments/assets/8a45a6d8-fbaf-4519-86f7-c7424ed780da" />
|
|
|
|
<img width="675" height="542" alt="image" src="https://github.com/user-attachments/assets/7e880d02-0f4f-459a-a3f6-216bcb1b04ca" />
|
|
|
|
<img width="675" height="570" alt="image" src="https://github.com/user-attachments/assets/2812ecc1-ecf0-44bd-9249-b76b30f8c25e" />
|
|
|
|
</details>
|
|
|
|
### Nginx-Proxy-Manager (NPM)
|
|
|
|
<details>
|
|
<summary>click here to expand</summary>
|
|
|
|
For a more complete example, see [this guide](https://github.com/nextcloud/all-in-one/discussions/588#discussioncomment-3040493).
|
|
|
|
Make sure `PUID` and `PGID` in the NPM `compose.yaml` are unset or set to `0`. If you need to change them, add `net.ipv4.ip_unprivileged_port_start=0` to `/etc/sysctl.conf`.
|
|
|
|
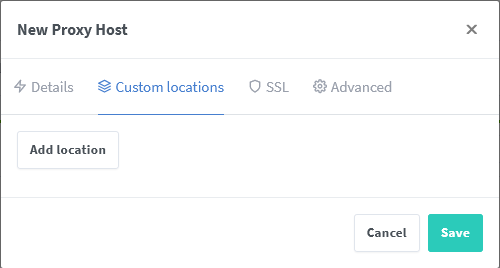
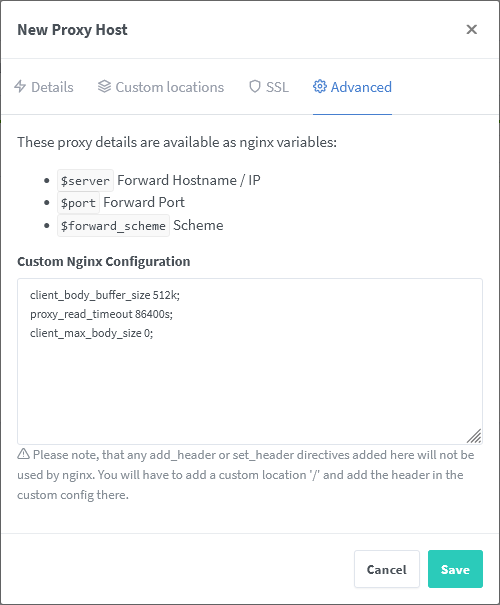
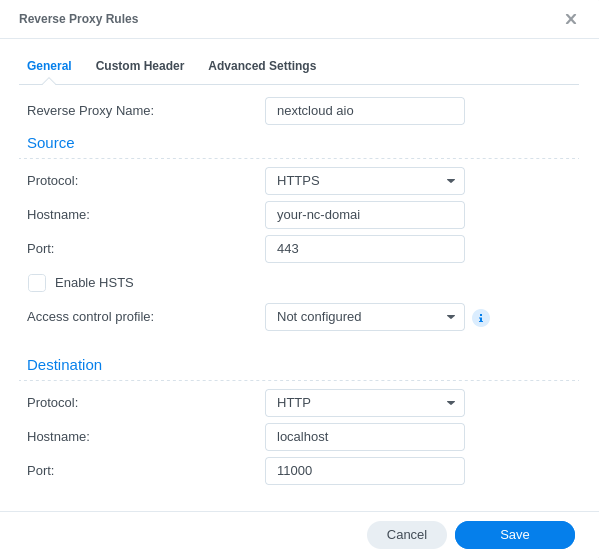
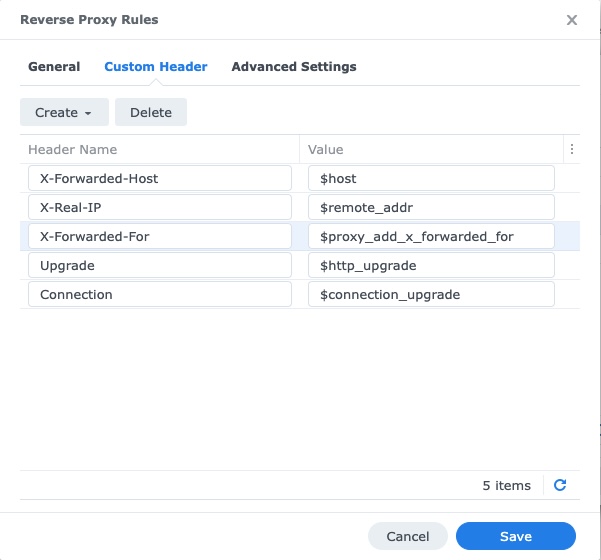
See these screenshots for a working config:
|
|
|
|

|
|
|
|
|
|
|
|

|
|
|
|
|
|
|
|
Also add the following advanced config:
|
|
```
|
|
client_body_buffer_size 512k;
|
|
proxy_read_timeout 86400s;
|
|
client_max_body_size 0;
|
|
```
|
|
|
|
Change `<you>@<your-mail-provider-domain>` to your email address.
|
|
|
|
</details>
|
|
|
|
### Nginx-Proxy
|
|
|
|
<details>
|
|
<summary>click here to expand</summary>
|
|
|
|
This refers to the [nginx-proxy project](https://github.com/nginx-proxy/nginx-proxy), not Nginx itself (see the `Nginx` section above for that).
|
|
|
|
Unfortunately `nginx-proxy` cannot be configured to work with AIO because it relies entirely on Docker container environment variables, which cannot be provided to AIO's Apache container.
|
|
|
|
We recommend switching to [Caddy](https://github.com/nextcloud/all-in-one/discussions/575) instead, or using [manual-install](https://github.com/nextcloud/all-in-one/tree/main/manual-install).
|
|
|
|
</details>
|
|
|
|
### Node.js with Express
|
|
|
|
<details>
|
|
<summary>click here to expand</summary>
|
|
|
|
**Disclaimer:** This config may need adjustments. Improvements welcome!
|
|
|
|
Uses the `http-proxy` npm package. WebSockets are handled separately.
|
|
|
|
```js
|
|
const HttpProxy = require('http-proxy');
|
|
const express = require('express');
|
|
const http = require('http');
|
|
|
|
const app = express();
|
|
const proxy = HttpProxy.createProxyServer({
|
|
target: 'http://localhost:11000',
|
|
timeout: 1000 * 60 * 3,
|
|
proxyTimeout: 1000 * 60 * 3,
|
|
autoRewrite: true,
|
|
followRedirects: false,
|
|
});
|
|
|
|
function onProxyError(err, req, res, target) {
|
|
if (err.code === 'ECONNREFUSED') {
|
|
return res.status(503).send('Nextcloud server is currently not running. It may be down for temporary maintenance.');
|
|
}
|
|
else {
|
|
console.error(err);
|
|
return res.status(500).send(String(err));
|
|
}
|
|
}
|
|
|
|
app.use((req, res) => {
|
|
proxy.web(req, res, {}, onProxyError);
|
|
});
|
|
|
|
const httpServer = http.createServer(app);
|
|
httpServer.listen('80');
|
|
|
|
httpServer.on('upgrade', (req, socket, head) => {
|
|
proxy.ws(req, socket, head, {}, onProxyError);
|
|
});
|
|
```
|
|
|
|
If using the `vhost` package, `proxy.web` can be scoped to the vhost but `proxy.ws` must remain global:
|
|
|
|
```js
|
|
const HttpProxy = require('http-proxy');
|
|
const express = require('express');
|
|
const http = require('http');
|
|
|
|
const myNextcloudApp = express();
|
|
const myOtherApp = express();
|
|
const vhost = express();
|
|
|
|
// Definitions for proxy and onProxyError unchanged. (see above)
|
|
|
|
myNextcloudApp.use((req, res) => {
|
|
proxy.web(req, res, {}, onProxyError);
|
|
});
|
|
|
|
vhost.use(vhostFunc('<your-nc-domain>', myNextcloudApp));
|
|
|
|
const httpServer = http.createServer(app);
|
|
httpServer.listen('80');
|
|
|
|
httpServer.on('upgrade', (req, socket, head) => {
|
|
proxy.ws(req, socket, head, {}, onProxyError);
|
|
});
|
|
```
|
|
|
|
</details>
|
|
|
|
### Synology Reverse Proxy
|
|
|
|
<details>
|
|
<summary>click here to expand</summary>
|
|
|
|
**Disclaimer:** This config may need adjustments. Improvements welcome!
|
|
|
|
See these screenshots for a working config:
|
|
|
|
|
|
|
|
|
|
|
|
</details>
|
|
|
|
### Tailscale (Serve)
|
|
|
|
<details>
|
|
<summary>click here to expand</summary>
|
|
|
|
Tailscale Serve exposes your Nextcloud privately to your tailnet only, using automatic HTTPS via MagicDNS.
|
|
|
|
For a full setup guide, see [this guide by @Perseus333](https://github.com/nextcloud/all-in-one/discussions/6817).
|
|
|
|
For public Internet access, use **Tailscale Funnel** instead.
|
|
|
|
</details>
|
|
|
|
### Traefik 2
|
|
|
|
<details>
|
|
<summary>click here to expand</summary>
|
|
|
|
**Disclaimer:** This config may need adjustments. Improvements welcome!
|
|
|
|
> [!NOTE]
|
|
> Docker labels won't work. Use [dynamic file configuration](https://doc.traefik.io/traefik/providers/file/#configuration-examples) instead.
|
|
|
|
For a more complete example, see [this video](https://www.youtube.com/watch?v=VLPSRrLMDmA).
|
|
|
|
1. In Traefik's static config, define a file provider:
|
|
|
|
```yml
|
|
# STATIC CONFIGURATION
|
|
|
|
entryPoints:
|
|
https:
|
|
address: ":443"
|
|
transport:
|
|
respondingTimeouts:
|
|
readTimeout: 24h
|
|
# If you want to enable HTTP/3 support, uncomment the line below
|
|
# http3: {}
|
|
|
|
certificatesResolvers:
|
|
letsencrypt:
|
|
acme:
|
|
storage: /letsencrypt/acme.json
|
|
email: <your-email-address>
|
|
tlschallenge: true
|
|
|
|
providers:
|
|
file:
|
|
directory: "/path/to/dynamic/conf"
|
|
watch: true
|
|
```
|
|
|
|
2. In `/path/to/dynamic/conf/nextcloud.yml`:
|
|
|
|
```yml
|
|
http:
|
|
routers:
|
|
nextcloud:
|
|
rule: "Host(`<your-nc-domain>`)"
|
|
entrypoints:
|
|
- "https"
|
|
service: nextcloud
|
|
middlewares:
|
|
- nextcloud-chain
|
|
tls:
|
|
certresolver: "letsencrypt"
|
|
|
|
services:
|
|
nextcloud:
|
|
loadBalancer:
|
|
servers:
|
|
- url: "http://localhost:11000"
|
|
|
|
middlewares:
|
|
nextcloud-secure-headers:
|
|
headers:
|
|
hostsProxyHeaders:
|
|
- "X-Forwarded-Host"
|
|
referrerPolicy: "same-origin"
|
|
|
|
https-redirect:
|
|
redirectscheme:
|
|
scheme: https
|
|
|
|
nextcloud-chain:
|
|
chain:
|
|
middlewares:
|
|
# - ... (e.g. rate limiting middleware)
|
|
- https-redirect
|
|
- nextcloud-secure-headers
|
|
```
|
|
|
|
</details>
|
|
|
|
### Traefik 3
|
|
|
|
<details>
|
|
<summary>click here to expand</summary>
|
|
|
|
**Disclaimer:** This config may need adjustments. Improvements welcome!
|
|
|
|
> [!NOTE]
|
|
> Docker labels won't work. Use [dynamic file configuration](https://doc.traefik.io/traefik/providers/file/#configuration-examples) instead.
|
|
|
|
1. In Traefik's static config, define a file provider:
|
|
|
|
```yml
|
|
# STATIC CONFIGURATION
|
|
|
|
entryPoints:
|
|
https:
|
|
address: ":443"
|
|
transport:
|
|
respondingTimeouts:
|
|
readTimeout: 24h
|
|
http:
|
|
# Required for Nextcloud to correctly handle encoded URL characters (%2F, %3F and %25 in this case) in newer Traefik versions (v3.6.4+).
|
|
encodedCharacters:
|
|
allowEncodedSlash: true
|
|
allowEncodedQuestionMark: true
|
|
allowEncodedPercent: true
|
|
# If you want to enable HTTP/3 support, uncomment the line below
|
|
# http3: {}
|
|
|
|
certificatesResolvers:
|
|
letsencrypt:
|
|
acme:
|
|
storage: /letsencrypt/acme.json
|
|
email: <your-email-address>
|
|
tlschallenge: true
|
|
|
|
providers:
|
|
file:
|
|
directory: "/path/to/dynamic/conf"
|
|
watch: true
|
|
```
|
|
|
|
2. In `/path/to/dynamic/conf/nextcloud.yml`:
|
|
|
|
```yml
|
|
http:
|
|
routers:
|
|
nextcloud:
|
|
rule: "Host(`<your-nc-domain>`)"
|
|
entrypoints:
|
|
- "https"
|
|
service: nextcloud
|
|
middlewares:
|
|
- nextcloud-chain
|
|
tls:
|
|
certresolver: "letsencrypt"
|
|
|
|
services:
|
|
nextcloud:
|
|
loadBalancer:
|
|
servers:
|
|
- url: "http://localhost:11000"
|
|
|
|
middlewares:
|
|
nextcloud-secure-headers:
|
|
headers:
|
|
hostsProxyHeaders:
|
|
- "X-Forwarded-Host"
|
|
referrerPolicy: "same-origin"
|
|
|
|
https-redirect:
|
|
redirectscheme:
|
|
scheme: https
|
|
|
|
nextcloud-chain:
|
|
chain:
|
|
middlewares:
|
|
# - ... (e.g. rate limiting middleware)
|
|
- https-redirect
|
|
- nextcloud-secure-headers
|
|
```
|
|
|
|
</details>
|
|
|
|
### IIS with ARR and URL Rewrite
|
|
|
|
<details>
|
|
<summary>click here to expand</summary>
|
|
|
|
**Disclaimer:** This config may need adjustments. Improvements welcome!
|
|
|
|
**Limitation:** Maximum upload size of 4 GiB (set to 2 GiB in the example below).
|
|
|
|
#### Prerequisites
|
|
1. **Windows Server** with IIS installed.
|
|
2. [**Application Request Routing (ARR)**](https://www.iis.net/downloads/microsoft/application-request-routing) and [**URL Rewrite**](https://www.iis.net/downloads/microsoft/url-rewrite) modules installed.
|
|
3. [**WebSocket Protocol**](https://learn.microsoft.com/en-us/iis/configuration/system.webserver/websocket) feature enabled.
|
|
|
|
See [IIS as a reverse proxy](https://learn.microsoft.com/en-us/iis/extensions/url-rewrite-module/reverse-proxy-with-url-rewrite-v2-and-application-request-routing) and the [IIS Manager docs](https://learn.microsoft.com/en-us/iis/) for setup guidance.
|
|
|
|
The config below assumes:
|
|
- A site with HTTPS and the desired hostname has been created.
|
|
- A server farm named `nc-server-farm` pointing to the Nextcloud server has been created.
|
|
- No global Rewrite Rules for `nc-server-farm` exist.
|
|
|
|
Add the following `web.config` to the site root:
|
|
|
|
```xml
|
|
<?xml version="1.0" encoding="UTF-8"?>
|
|
<configuration>
|
|
<system.web>
|
|
<!-- Allow all urls -->
|
|
<httpRuntime requestValidationMode="2.0" requestPathInvalidCharacters="" />
|
|
</system.web>
|
|
<system.webServer>
|
|
<rewrite>
|
|
<!-- useOriginalURLEncoding needs to be set to false, otherwise IIS will double encode urls causing all files with spaces or special characters to be inaccessible -->
|
|
<rules useOriginalURLEncoding="false">
|
|
<!-- Force https -->
|
|
<rule name="Https" stopProcessing="true">
|
|
<match url="(.*)" />
|
|
<conditions>
|
|
<add input="{HTTPS}" pattern="^OFF$" />
|
|
</conditions>
|
|
<action type="Redirect" url="https://{HTTP_HOST}/{REQUEST_URI}" appendQueryString="false" />
|
|
</rule>
|
|
<!-- Redirect to internal nextcloud server -->
|
|
<rule name="To nextcloud" stopProcessing="true">
|
|
<match url="(.*)" />
|
|
<conditions>
|
|
<add input="{HTTPS}" pattern="^ON$" />
|
|
</conditions>
|
|
<!-- Note that {UNENCODED_URL} already contains starting slash, so we must add it directly after the port number without additional slash -->
|
|
<action type="Rewrite" url="http://nc-server-farm:11000{UNENCODED_URL}" appendQueryString="false" />
|
|
</rule>
|
|
</rules>
|
|
</rewrite>
|
|
<security>
|
|
<!-- Increase upload limit to 2GiB -->
|
|
<requestFiltering allowDoubleEscaping="true">
|
|
<requestLimits maxAllowedContentLength="2147483648" />
|
|
</requestFiltering>
|
|
</security>
|
|
</system.webServer>
|
|
</configuration>
|
|
```
|
|
|
|
</details>
|
|
|
|
### Others
|
|
|
|
<details>
|
|
<summary>click here to expand</summary>
|
|
|
|
Config examples for other reverse proxies are currently not documented. Pull requests are welcome!
|
|
|
|
</details>
|
|
|
|
---
|
|
|
|
## 2. Startup command
|
|
|
|
After configuring your reverse proxy, start the mastercontainer with `APACHE_PORT` set:
|
|
|
|
```
|
|
# For Linux:
|
|
sudo docker run \
|
|
--init \
|
|
--sig-proxy=false \
|
|
--name nextcloud-aio-mastercontainer \
|
|
--restart always \
|
|
--publish 8080:8080 \
|
|
--env APACHE_PORT=11000 \
|
|
--env APACHE_IP_BINDING=0.0.0.0 \
|
|
--env APACHE_ADDITIONAL_NETWORK="" \
|
|
--env SKIP_DOMAIN_VALIDATION=false \
|
|
--volume nextcloud_aio_mastercontainer:/mnt/docker-aio-config \
|
|
--volume /var/run/docker.sock:/var/run/docker.sock:ro \
|
|
ghcr.io/nextcloud-releases/all-in-one:latest
|
|
```
|
|
|
|
<details>
|
|
<summary>Explanation of flags</summary>
|
|
|
|
- `--init` — Prevents zombie processes.
|
|
- `--sig-proxy=false` — Allows `Ctrl+C` to detach without stopping the container.
|
|
- `--name nextcloud-aio-mastercontainer` — **Do not change.** Required for mastercontainer updates.
|
|
- `--restart always` — Auto-starts with the Docker daemon.
|
|
- `--publish 8080:8080` — Exposes the AIO management interface. Change the host port if needed (e.g. `--publish 8081:8080`), but keep the container port at `8080`.
|
|
- `--env APACHE_PORT=11000` — Port the reverse proxy should forward to.
|
|
- `--env APACHE_IP_BINDING=0.0.0.0` — Limits which IPs can reach the Apache port. See [step 3](#3-limit-access-to-the-apache-container).
|
|
- `--env APACHE_ADDITIONAL_NETWORK=""` — Attaches AIO's Apache container to a Docker network (useful when the reverse proxy is a container on the same host). See [adapting the configs](#adapting-the-sample-configurations).
|
|
- `--env SKIP_DOMAIN_VALIDATION=false` — Set to `true` only if you're sure everything is correctly configured. See [how to skip domain validation](https://github.com/nextcloud/all-in-one#how-to-skip-the-domain-validation).
|
|
- `--volume nextcloud_aio_mastercontainer:/mnt/docker-aio-config` — **Do not change.** Required for built-in backups.
|
|
- `--volume /var/run/docker.sock:/var/run/docker.sock:ro` — Grants Docker socket access. Adjust for Windows/macOS or Docker rootless (also set `WATCHTOWER_DOCKER_SOCKET_PATH`). See [manual-install](https://github.com/nextcloud/all-in-one/tree/main/manual-install) as an alternative.
|
|
|
|
</details>
|
|
|
|
<details>
|
|
<summary>Command for Windows</summary>
|
|
|
|
Install [Docker Desktop](https://www.docker.com/products/docker-desktop/) (and [enable IPv6](https://github.com/nextcloud/all-in-one/blob/main/docker-ipv6-support.md) if needed), then run in Command Prompt:
|
|
|
|
```
|
|
docker run ^
|
|
--init ^
|
|
--sig-proxy=false ^
|
|
--name nextcloud-aio-mastercontainer ^
|
|
--restart always ^
|
|
--publish 8080:8080 ^
|
|
--env APACHE_PORT=11000 ^
|
|
--env APACHE_IP_BINDING=0.0.0.0 ^
|
|
--env APACHE_ADDITIONAL_NETWORK="" ^
|
|
--env SKIP_DOMAIN_VALIDATION=false ^
|
|
--volume nextcloud_aio_mastercontainer:/mnt/docker-aio-config ^
|
|
--volume //var/run/docker.sock:/var/run/docker.sock:ro ^
|
|
ghcr.io/nextcloud-releases/all-in-one:latest
|
|
```
|
|
|
|
</details>
|
|
|
|
For Synology DSM, see [How to run AIO on Synology DSM](https://github.com/nextcloud/all-in-one#how-to-run-aio-on-synology-dsm).
|
|
For macOS, see [How to run AIO on macOS](https://github.com/nextcloud/all-in-one#how-to-run-aio-on-macos).
|
|
|
|
You may also want to [change the Nextcloud data directory location](https://github.com/nextcloud/all-in-one#how-to-change-the-default-location-of-nextclouds-datadir).
|
|
|
|
### Docker Compose
|
|
|
|
Translate the `docker run` command into a Compose file. See [compose.yaml](https://github.com/nextcloud/all-in-one/blob/main/compose.yaml) for inspiration and [this discussion](https://github.com/nextcloud/all-in-one/discussions/588) for community examples.
|
|
|
|
---
|
|
|
|
## 3. Limit access to the Apache container
|
|
|
|
To restrict the Apache port to localhost only (recommended when the reverse proxy is on the same host):
|
|
|
|
```
|
|
--env APACHE_IP_BINDING=127.0.0.1
|
|
```
|
|
|
|
> [!NOTE]
|
|
> Use `127.0.0.1` only if your reverse proxy connects via `localhost`. If it connects via an IP address, use `0.0.0.0`.
|
|
|
|
---
|
|
|
|
## 4. Open the AIO interface
|
|
|
|
Access `https://<host-ip>:8080`, enter your domain, and validate it.
|
|
|
|
> [!IMPORTANT]
|
|
> Always use the **IP address**, not a domain name, to access port `8080`. HSTS may block domain-based access later. This port uses a self-signed certificate — accept the browser warning.
|
|
|
|
After validating the domain, open/forward port `3478/TCP` and `3478/UDP` in your firewall/router if you use Nextcloud Talk.
|
|
|
|
---
|
|
|
|
## 5. Optional: Trusted proxy configuration
|
|
|
|
### IP-based reverse proxy
|
|
|
|
If your reverse proxy connects to AIO using a non-localhost IP, add it as a trusted proxy:
|
|
|
|
```
|
|
sudo docker exec --user www-data -it nextcloud-aio-nextcloud php occ config:system:set trusted_proxies 2 --value=ip.address.of.proxy
|
|
```
|
|
|
|
### Collabora WOPI allow list
|
|
|
|
If the reverse proxy connects to Nextcloud via an IP different from your public domain's IP (e.g. via Tailscale or Cloudflare Tunnel), also add the proxy IP to the WOPI allow list via:
|
|
**Administration Settings → Administration → Office → Allow list for WOPI requests**
|
|
|
|
> For Cloudflare Tunnel, add all [Cloudflare IP ranges](https://www.cloudflare.com/ips/) to the WOPI allowlist.
|
|
|
|
### External reverse proxies via VPN (e.g. Tailscale)
|
|
|
|
If your reverse proxy is outside your LAN and connecting via VPN, set `APACHE_IP_BINDING=AIO.VPN.host.IP` to restrict access to VPN traffic only.
|
|
|
|
---
|
|
|
|
## 6. Optional: Valid certificate for the AIO interface
|
|
|
|
Add this to your Caddyfile to serve the AIO interface with a valid certificate:
|
|
|
|
```
|
|
https://<your-nc-domain>:8443 {
|
|
reverse_proxy https://localhost:8080 {
|
|
header_up Host {host}
|
|
transport http {
|
|
tls_insecure_skip_verify
|
|
}
|
|
}
|
|
}
|
|
```
|
|
|
|
The AIO interface will then be available at `https://<host-ip>:8443`. You can also use a different subdomain with port `443`.
|
|
|
|
---
|
|
|
|
## 7. Troubleshooting
|
|
|
|
If something isn't working:
|
|
|
|
1. Follow this documentation from top to bottom exactly.
|
|
2. Verify you used `--env APACHE_PORT=11000` in the `docker run` command.
|
|
3. Verify `APACHE_IP_BINDING` is correct — if in doubt, use `0.0.0.0`.
|
|
4. Verify all proxy target ports match `APACHE_PORT`.
|
|
5. Adapt the sample config to your setup — see [Adapting the sample configurations](#adapting-the-sample-configurations).
|
|
6. Check that the mastercontainer has access to the Docker socket. Run `sudo docker logs nextcloud-aio-mastercontainer` to inspect logs.
|
|
7. Test Apache port reachability from inside the reverse proxy container: `nc -z localhost 11000; echo $?` (output `0` = success).
|
|
8. Check if you're behind CGNAT — if so, you cannot open ports. Use a Cloudflare Tunnel instead.
|
|
9. If using Cloudflare, you may need to skip domain validation (`--env SKIP_DOMAIN_VALIDATION=true`).
|
|
10. If using a host-network or host-based reverse proxy, ensure your firewall allows ports 80 and 443.
|
|
11. Verify your public IP situation (IPv4 only, IPv6 only, or dual-stack). For IPv6-only setups, [enable IPv6 in Docker](https://github.com/nextcloud/all-in-one/blob/main/docker-ipv6-support.md) and add an AAAA DNS record.
|
|
12. [Enable Hairpin NAT](https://github.com/nextcloud/all-in-one/discussions/5849) or [set up a local DNS server](https://github.com/nextcloud/all-in-one#how-can-i-access-nextcloud-locally) for local access.
|
|
13. As a last resort, reset from scratch: [how to properly reset the instance](https://github.com/nextcloud/all-in-one#how-to-properly-reset-the-instance).
|
|
14. If all else fails, disable domain validation: `--env SKIP_DOMAIN_VALIDATION=true` — only use this if you are certain everything is configured correctly. See [how to skip domain validation](https://github.com/nextcloud/all-in-one#how-to-skip-the-domain-validation).
|
|
|
|
---
|
|
|
|
## 8. Removing the reverse proxy
|
|
|
|
1. Stop all running containers in the AIO interface.
|
|
2. Stop and remove the mastercontainer:
|
|
```
|
|
sudo docker stop nextcloud-aio-mastercontainer
|
|
sudo docker rm nextcloud-aio-mastercontainer
|
|
```
|
|
3. Remove the reverse proxy software and configuration (see step 1).
|
|
4. Restart the mastercontainer using the [standard run command](https://github.com/nextcloud/all-in-one#how-to-use-this), but add before the last line:
|
|
```
|
|
--env APACHE_IP_BINDING=0.0.0.0 \
|
|
--env APACHE_PORT=443 \
|
|
```
|
|
5. Restart all other containers in the AIO interface.
|
|
|
|
---
|
|
|
|
## Footnotes
|
|
|
|
[^talkPort]: Ports 3478/TCP and 3478/UDP are also required if using Nextcloud Talk (but they're less likely to conflict with existing services).
|
|
[^shared]: Other Nextcloud Server deployment methods (but not AIO) can be deployed behind shared hostnames and accessed via subfolder-based URLs. Note that pure subfolder deployments are less common these days, with the broad support for virtual host-based access.
|